Moving is not activating: finding a route through the Sphere Grid
The Standard Sphere Grid gives Final Fantasy X’s party distinct early paths, then lets those paths branch into more flexible development. Understanding Sphere Levels, node activation and locked intersections helps you spend movement and spheres deliberately.
Coverage: Covers the Sphere Grid’s movement, node activation, starting routes and later flexibility. No plot revelations.
Move first, then activate nodes
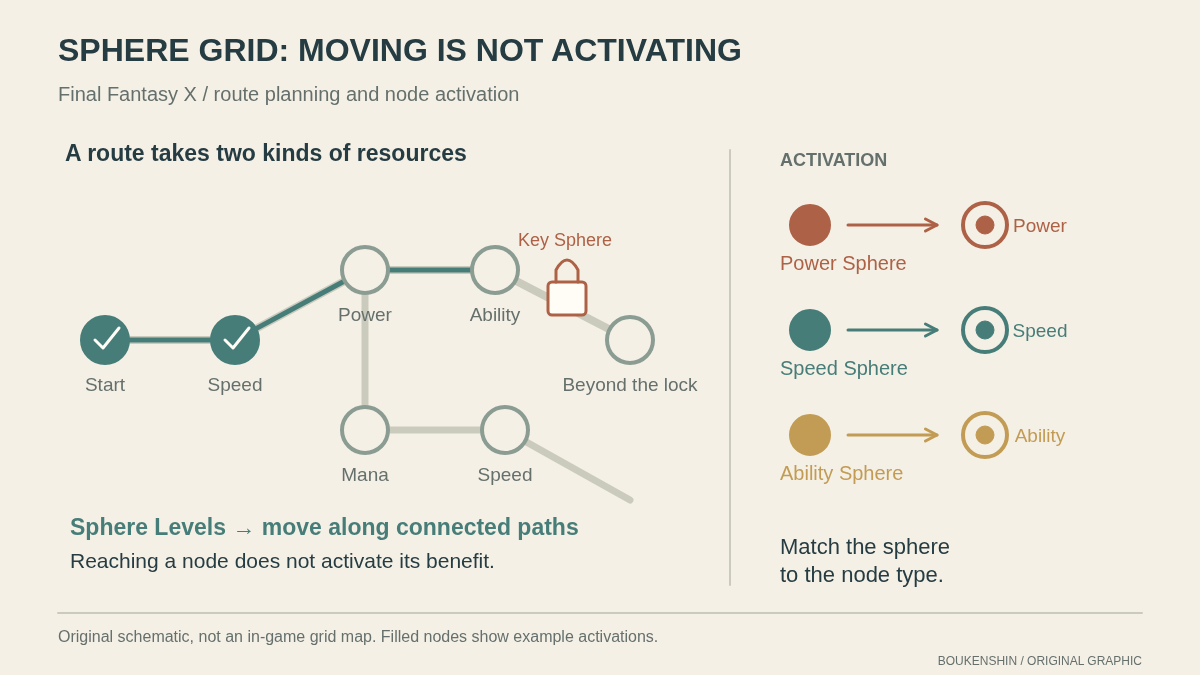
On the Standard Sphere Grid, a character’s growth is something you navigate. Earning a Sphere Level gives that character movement on the grid; it does not automatically grant every benefit along the way. As you travel, you can pass nodes without activating them, so reaching a promising position and making it count are separate decisions. This distinction matters when you are planning a route: movement gets a character to useful spaces, while spheres turn those spaces into upgrades.
The sphere type must match the node. Power Spheres activate Power nodes, Mana Spheres activate Mana nodes, Speed Spheres activate Speed nodes, and Ability Spheres activate Ability nodes. If Tidus has moved beside a Speed node but you have no Speed Sphere to activate it, he can still be standing there without receiving that benefit. Before using a Sphere Level, look at nearby nodes and consider whether you have the spheres to activate the ones you want.
Early routes explain each character’s role
The grid’s opening paths give the party recognizable strengths. Tidus’s route emphasizes speed, Wakka’s develops accuracy and status options, and Auron’s favors strength and tools for armored targets. Lulu’s path centers on black magic, while Yuna’s builds white magic. These are useful early guides to what each character can contribute in battle, rather than permanent rules about how you must use them.
That layout helps while the party is still learning to handle different enemies. If a flying target is giving you trouble, Wakka is the straightforward choice because he hits flying enemies reliably. Against an armored foe, Auron’s Piercing weapons help his attacks get through. A flan calls for Lulu’s elemental magic: choose an element that suits the encounter and cast it. These roles make party choices easier to read, but not every enemy is a single-answer puzzle, and development can change what a character is good at.
Locks mark the limits of a route
Grid paths sometimes meet locked intersections. A character cannot simply travel through one because the next section looks useful; a Key Sphere is needed to open the lock. Until you have the appropriate Key Sphere, that barrier constrains which connected areas you can reach. It is a reason to consider another nearby route or to keep progressing with the nodes already available.
Treat a locked intersection as a planning cue, not a promise about exactly when a path will open. The grid shows where movement is blocked, while Key Spheres provide access when available. You do not need to force every character toward the same locked area. For example, if Tidus reaches a blocked junction, he can continue developing along his accessible route while you reserve other movement choices for a path that is currently open.
Branching lets you revise a character’s role
Later branching opens more flexibility, so the early routes are a starting structure rather than a fixed destiny. As paths connect and choices broaden, you can move a character toward abilities associated with another part of the grid. That can make a familiar role more versatile: a character who began with a narrow specialty can gain access to tools that support a different contribution to the party.
A practical approach is to build around what your party needs now, then use later options to broaden a character when a new role would help. If you rely on Tidus to handle quick actions, you can keep following his familiar path; if you want him to contribute differently later, branching gives you room to pursue that direction. The tradeoff is that movement and activation still require Sphere Levels and matching spheres, so detours take resources and planning. The grid rewards noticing both the route ahead and the nodes you can activate along it.
Primary work & further reading
Primary work: Final Fantasy X. Character and story readings are editorial interpretations. The publisher reference below identifies the work and its premise.